Friday, August 28, 2015

FROM BORING TO BEAUTIFUL ON BEAR CREEK


Searching for properties has at least one thing in common with searching for romantic partners.   When you find The One, you know it with your whole being immediately.  And then you take awhile to kick yourself for putting so much time and effort into convincing yourself that something else maybe could be, with some effort, and a miracle or two, be The One.

The Bear Creek house itself looked like someone borrowed the plans from a tract home in a so-so subdivision and built it where it didn't belong.  It was completely unworthy of the 4+ acres of picturesque hilly terrain with 200 year old oak trees, rocky bluffs
and a lovely creek running all along the back property line.

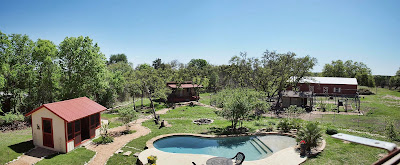
It had a decent pool, an awesome barn,
a rustic sheep barn, great fencing for miles, a nice sized playhouse with crown moulding and a big front porch
but a really boring house that looked like all garage.

Besides sticking out like a sore thumb in its beautiful setting, the house had been a rental for a few years and showed signs of neglect.  My favorite was the whole cactus garden growing around the perimeter of the house in the gutters.  

The most obvious thing that this house was screaming out for was an entrance.  If you imagine the street being at 12 o'clock from the house, there was a front door but was looking at 7 o'clock.  And 7 o'clock was two overgrown shrubs that blocked the view of all the beautiful scenery around the house.  The picture above is the street view, which is a full on view of the left side of the house.  The building on the left is the garage, which is in connected to the house in an "L" shape by a breezeway.  Pay attention to the window and two chairs on the tiny front porch above.  When you see the pictures of the new foyer later, that will be the area you're looking at.We knew instantly this house was The One for Team Jerri and Virgil.

We completely renovated this house inside and out.  In order to keep this post from getting two long (and because I'm not completely organized with pictures of the inside yet), I'll do one post with pictures of the outside renovations and one with the inside.  Also stay tuned for an upcoming post Shabby Sheep Barn Turned Shabby Chic Guest Cottage.

The arched window you see in the picture is over the original front door.  What you saw when you looked out the front door was the overgrown shrub that fills the whole archway on the front porch.


The front door faced the white fence to the left of the barn and humongous oak trees-OK humongous for Texas.  The only exception I know of to the rule that "Everything's bigger in Texas", is trees.  I forget that until I visit my family in Ohio and marvel over the height of the trees. Here's some of the scenery being blocked by the overgrown shrubs and odd orientation of the front door.


When we bought the property, two horses and a goat mysteriously appeared in the pasture every morning.  After a week, we encountered their owner who had an arrangement with the seller of the property to bring her animals over to graze every day.  We liked visiting with them and kept up this practice until the day we found the goat in our dining room, but I digress.

Here's another view of the outside of the original house.  It looks a lot bigger with the garage and breezeway included.

Are you ready to see the "After" pictures of the outside of the house?  Well, hold your horses.  It is my blog and I insist you suffer through some "During" pictures first.  One thing that appealed to us when we looked at this house was that it had 800 square feet of unfinished attic space, most of it a usable height.  Finding space that is partially built but not included in the square footage when you buy a house is one of the best sources of profits because, technically, you don't pay for that square footage.  You can finish it out for less than the cost of all new construction and, after it's finished out, you can sell that square footage at whatever price per square foot homes are selling for in the area.

So, we knew we were going to make the house two stories, but what happened next is what tends to happen when The Big Idea Guy, aka Virgil is left unsupervised for any period of time.  I left the house in the morning with the understanding that the roof was going to be raised 2 feet so that all of the upstairs space would usable.  Does this look like two feet to you?

In his defense, he felt that as long as we were going to pay the cost of raising the roof, the additional materials required to raise it a few more feet so that all the space was not only usable, but had high ceilings AND  a space between floors to prevent noise transfer from children doing gymnastics upstairs to parents enjoying peace and quiet downstairs, was worth the cost.  As usual, he was right about that decision.  It also created some killer sunset views from the back of the house.

The next thing we tackled was reorienting the house so that the front faced the road.  To accomplish this, we enclosed the little porch you saw earlier with the small window and folding chairs to create a foyer.  We made an opening for the front door on the side of the foyer facing the road and reused the original double door unit (without the arch, which felt like an 80's detail to me).  After relocating the front door, we added a porch from the breezeway between the house and garage, across the front of the house, wrapped around the corner and matched it up with the outside line of a the small bedroom that stuck out from the right side of the house.  In order keep the porch from looking too small for the new overall height of the house, we built a gable on top of the porch roof that tied the two levels together.
He we are pouring the slab for the new porch.  You can see from this picture where the side bedroom was that we used as the outer line for the new porch.

Next, we thought what you all must be thinking: "What's a front porch without a fireplace?" Right?  So we added a fireplace.  Awesome place to toast marshmallows or sip a glass of Fireball after the kiddos are in bed.  Can I get a witness on the Fireball on the front porch?


And here is the house after the exterior renovations.  No question where the front door is now.  It's facing the road.  We did have to re-roof the house when we raised the roof, but the budget didn't allow us to put metal roofing on the whole house.  We really thought metal roofing was perfect for this style of home, so we compromised on a brown metal roof on the wraparound porch only.
Here's are "Before" and "After" pictures next to each other.


Here are pictures of the fireplace and porch:


This post is supposed to be about the exterior renovation only, but I did tell you to take note of the small front porch with the small window and folding chairs to compare it to the picture after it became the foyer of the house.  Since it was originally exterior space, I say it qualifies for this post, so here is the original front porch after it became the foyer.

The lovely bench was custom made by Virgil's dad to go in this space.  The picture window looks out at the fireplace on the front porch and the barn beyond.

We're pretty sure we nailed it.  If you agree, leave us a comment.  Or just have a Fireball in our honor.  It's still too hot for Fireball in Texas.  Thank you for visiting.


UA-66929823-1

Tuesday, August 25, 2015

HOW TO MAKE IRON PLUMBING PIPE SHELF UNITS

HOW TO MAKE IRON PLUMBING PIPE SHELF UNITS

I've gotten so many nice comments about the iron pipe shelf units we installed in our most recent renovation project (See post FROM MUNSTER MANSION TO MAGNIFICENT), that I thought I would write a quick tutorial about how to make one of these units yourself.  Here is a picture of the two shelf units we installed during this renovation:


I had seen similar units installed by Chip and Joanna Gaines in a kitchen during an episode of Fixer Upper on HDTV, found several examples on Pinterest and couldn't wait until our next home renovation project to make some myself.  I decided to make 5 ft. tall units in this room with 9 foot ceilings so that there would be a full 4 feet of space underneath in case the future owner of the house wanted to put cabinets, extra seating or other furniture below the shelves.  The way I determined the width of each unit was by figuring out how far apart the studs in the wall were and seeing what sizes of pre-finished shelves were available at Lowe's that would be a good match for our wood flooring.  My studs were 16" apart and I found 36" shelves so I attached the pipe supports 32" apart allowing both of them to be attached to studs and give me 2" of overhang on each side.

Here are the materials I used for one 5 ft high unit:
Iron plumbing pipe (there are  1/2", 3/4" and 1" diameter options-I used 3/4"):
18 12" pipes
2 straight "coupling" fittings
6 T shaped connectors
2 elbow connectors
10 floor flanges
4 shelves (I used 36" long x 3/4" wide x 12" deep shelves that were refinished on all sides)
20 2 and 1/2" wood screws
20 1" wood screws
Drywall anchors as needed
Degreaser (I used Simple Green)
Dark bronze spray paint ( I used Rustoleum)

The dark plumbing pipe comes covered in grease, so don't wear good clothes to the store to buy it.  I looked at 3 places and all of the straight sections I pipe I saw came with a big price label throughly attached with packing type tape.  To get the labels and the grease off, I had to soak the pipe in a 5 gallon bucket with water and degreaser for a couple of hours.  Learn from my mistake: if you soak the pipe overnight or leave it sitting in a puddle of water or leave water sitting inside, you will have a lot of rust in less than a day.  If you're after a more rustic, rusty look, that's good.  Otherwise, take the pipe out, stand it up to drain and dry it within a couple of hours.  "Drying" the pipe entails wiping all the grease off with rags, so have plenty on hand.  I used one of my favorite tools, a razor blade, to cut the tape and tags off.

After degreasing, the pipe was still the right color, but I could not find floor flanges (the flat circular piece that attaches to the wall and ceiling) in anything but silver galvanized metal.  My trusty Lowe's rep told me that he had never seen the flanges in the darker metal, so I took him at his word and spray painted all of the flanges (and screws) with the bronze spray paint.  I later saw black iron flanges on Lowes.com and realized my trust had been misplaced.  So, if you find the black ones, use them instead of painting.

The next step was like playing with adult Legos and my daughter and I had fun doing it.  You just have to look at the picture to see how the parts screw together and screw them together.  A word to the wise:  The pipes do not screw together as smoothly without the grease as they would with the grease; therefore, so patience is required to keep the threads straight while attaching the pipe parts together.

By the time I got halfway through the second shelf unit, I realized that things worked best when I tightened the pipes enough to hold everything together well, but not all the way.  The reason is that after I attached the whole support unit to the wall and ceiling, I needed to loosen and tighten some  pipe sections to adjust for any unevenness in the walls and ceiling and to level the shelves.

After putting the pipe sections together, I used a stud finder to find the studs in the walls and marked where each support section would be attached to the ceiling and wall.  Some of the places where the flanges needed to attach to the ceiling fell on wood joists and some didn't, so I used heavy duty drywall anchors in those spots where there was no wood to which I could attach the ceiling flange.

Time to pause for another word to the wise:  HVAC ducts generally run in straight lines between those big ole beams that hold up your roof or second floor.  It's a really good idea to look in both directions from where you're planning to stick a 2 1/2" screw into your ceiling to make sure there isn't a ceiling register in that straight line.  If there is, that register is more than likely attached to a duct that you don't want to make a hole in with your screw, so you'd be better off moving on down the line to the next wall stud.  If you're making two units like I did, the space in between depends on the look you want and how big your wall is, but I left about 42" between the units in case the new homeowners wanted space to mount a flat screen TV between them.  In general, I think it is most pleasing to the eye to separate two units by a space roughly equal to the width of one unit i.e. if you have two 36" units, put them somewhere in the vicinity of 36" apart.

The hardest part of this project is attaching the units to the walls and ceiling.  Use a stud finder, level and pencil to mark straights lines on the walls before you begin, because it's much easier to erase the pencil than touch up the paint on the walls and ceiling after you bang them up trying to measure, level and wrestle the pipe into submission all at the same time.  This is definitely a two person operation.

The reason I used different sized screws was that the flanges that attach to the wall and ceiling have four holes in them located at (if they were on a clock) 12, 3, 6 and 9 o'clock.  I lined them up so that the holes at 12 and 6 o'clock would attach to the studs and used the 2 1/2" screws in those holes.  The screws in the 3 and 9 o'clock holes may or may not hit the stud, but probably will not, so I used the 1" screws there.  Basically the 1" screws are decorative so that all of the holes in the flange are filled with a screw, but are not functional as the longer screws are actually holding the unit in place.  The other reason for using the shorter screws is that, since they are basically non-functional, it was not worth the added risk that longer screws would run into something else in the walls or ceiling.  If I had had 1/2" or 3/4" screws on hand, I probably would have used them in the 3 and 9 o'clock holes.

The only thing left to do is put the shelves in place.  When I did this, there were several shelves that didn't sit flat or level.  To correct this, I placed a level on each shelf and tightened or loosened the connections between the pipe sections until each shelf sat level.  If one wanted the shelves to be more secure, it might be a good idea to get "C" clamps the diameter of your pipes, snap them on the pipe and screw each shelf to the pipe it rests on.  I wasn't planning to put heavy objects or objects that get used regularly, nor do I have small children, so I skipped that step.

I hope this has been helpful and that you'll be brave and make your own industrial/modern/country/farmhouse shelf units.


This is really an easy DIY project and I love how the look can range from farmhouse industrial to modern to country depending on the rest of the room and the items you put on the shelves.  

Sunday, August 23, 2015

THE LITTLE RED CHICKEN RANCH GETS A FACELIFT


 The Little Red Chicken Ranch


One Sunday evening, while the Virgil half of Team Jerri and Virgil was just settling down for a movie with is son, Jerri came across a sign that read "Auction" and (naturally) drove by to investigate.  It turns out that an auction was scheduled two weeks later for both the real estate and contents of the home, several outbuildings and a very large barn.  The property was exactly what we had spent nearly two years looking for as our personal residence, but there was a problem:  we had recently bought a home to live in.  

After convincing Virgil to leave the movie theater and make a bee-line straight to the property, we agreed that, we didn't know if we were going to live in it or sell it, but it was definitely a property we wanted to own.  The following morning we made the owner an offer and were very pleased that she was ready to sell the property immediately.  After much angst, we decided that, even though the property was just the little farmhouse we had wanted for ourselves, our daughter was thriving at her new school and it just wasn't the right thing to move her.  So, the Little Red Farm became our next renovation project.

The property offered 2 unspoiled acres only 25 minutes to downtown Austin, was very charming AND came coming complete with 37 chickens and 2 goats.  What was not to love?  Well . . . there were a few things not to love, number 1 on the list being the two (male) goats.  After several incidents in which the goats either reared up or tried to mount me or our daughter, we decided we'd be happier without their company.  We "re-homed" them with a family who wanted to mate them with two female goats they had received from in-laws so that they could grow their own goat family for food.  After the goats got to their new home, it was discovered that they were neutered (so no use at all in fathering) and they were promptly returned to us.  These overgrown 4-H projects that stayed on after the prior owner's kids had grown up and moved on were too old and tough to eat, besides we promised the prior owner we wouldn't give them to anyone who was planning to eat them, so it was back to the "re-homing" drawing board.  Eventually, a kind soul down the road who rescues animals of all sorts agreed to take them on.

A few other items not to love:  some very interesting, and definitely not-to-code wiring that the non-electrician prior owner had run to all of the ancillary buildings on the property, about 30 dead oak trees and a neighbor who was vehemently opposed to burning of all kinds.  After checking with the forestry department at Texas A&M University, we determined that the best way to deal with the dead trees was to cut them down and burn them as quickly as possible thereafter to prevent the spread of oak wilt.  We obtained a burn permit from the fire department, took down the dead trees and started burning-until our neighbor called the fire department-each and every time we tried to burn the dead trees.  Here they come again:

Last but not least of the things not to love, there were some rather extreme "chicken snakes" that were attracted to the chicken coop.  We didn't love them at all.  


So, here are some before and after pictures of the Little Red Chicken Farm for your enjoyment.  While we swell up with pride every time people look at one of our projects and say "NO WAY THAT'S THE SAME HOUSE!", we loved the "old German farmhouse" character and feel of this home and really wanted to preserve it.  

Front of The Little Red Chicken Ranch Before


And After

Rear of Home Before


And after.  We removed overgrown plants, added french doors, painted the metal roof, added porches, decking and wrought iron railings, added a fire pit, painted all ancillary buildings to match, built coverings for HVAC and pool equipment, planted grass and created paths between the main house and ancillary buildings:

The original barn with the property was very sizable, but the roof structure had suffered severe wood rot and was no longer stable.  In fact, a large section of the roof had caved in.
This is the barn after we replaced the roof structure and roof, replaced missing doors and windows and gave it a red paint job to match the roof and trim on other structures on the property.  And of course it had to have white trim "X's" on the doors.
Before we move to the inside of the house, here are some more pictures of the back yard before and after renovation:
The key to turning the back yard into a resort-like setting was ridding the property of dead trees and shrubs, collecting rocks that were strewn through the property and to creating pathways between the several buildings on the property, pulling weeds, weeds and more weeds, adding some new flowers and shrubs, planting grass, repairing fencing and, very importantly, giving a fresh paint job and plenty of lighting to all buildings so that the property felt like a planned undertaking rather than a several run down buildings sprinkled over the two acres.


Pool cabana before and after:
Home office before and after.  In addition to paint, we rebuilt the porch (due to wood rot) and added wrought iron railing, changed the roof to match the house, and added underpinning around the whole structure:
The well house before and after.  Again, there was significant wood rot, as well as termite damage.  After replacing damaged wood members, we gave it a fresh coat of paint and added a porch light and red metal roofing to match the main house:

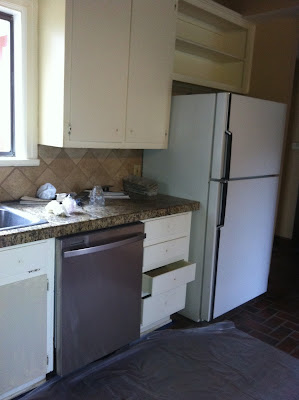
Are you ready to see the inside?  Here are some before and after pictures of the inside of the house.  The kitchen had plenty of character, but the wood work was very damaged from pets and it appeared dingy and dated.  The stonework on the fireplace needed repairs and the brick paver floor and grout was dull and dark.


After cleaning, painting the cabinets and walls, refinishing the woodwork, and updating hardware and appliances, adding additional ceiling lights and under-counter lights, it looks up to date, but still retains its old world charm.  We also replaced some of the solid cabinet doors with glass doors.  We also removed a cabinet that was too close to the cook top and replaced it with a tile mosaic.  Look how days of cleaning brought back the luster to the brick tile floors.  Between the cabinets, countertops and floors, I spent days on end on my knees scrubbing and scraping.  I went through boxes of razor blades. 

Below is the eating area of the kitchen before and after.  Is that fireplace awesome or what? It reminded me of kitchen fireplaces I've seen in several old houses in Italy.

Before the renovation, this home had a small bedroom in back that had been used as a family room.  It was dark due to having only two small windows that were covered by overgrown shrubs.  This room was connected through an exterior door to an unfinished room that had apparently been added onto the house after the original construction.  The prior owners had used it as a storage room.  As part of the renovation, we took down the wall between these two spaces, leveled up the floors and finished the walls in the storage room in order to create one large family room.  To make the room lighter and create direct access to the pool area, we added French doors between the two original windows.
For structural reasons, and due to different ceiling heights in the two rooms, it was necessary to keep part of the wall between the rooms.  We added a chair rail throughout to make the space feel coherent.
I'm just getting the hang of this blogging thing, so I was not completely prepared with "before" pictures of the whole house, but here are some after pictures of other rooms in the house.  The living room had original ship lap walls that we wouldn't dare have touched other than to fill some holes and paint.  It also had wonderful beams and ceilings and another stone fireplace wall.  We refinished the baseboards, trim, wood flooring in the entry and wood stairs to the second floor.

The master bedroom was large, with high ceilings.  We gave it fresh paint and carpet, changed the rotted door and expanded a small outdoor deck and added railings to make a nice outdoor sitting area off the bedroom.  We wanted to retain the "country" feel of the bedroom and give a small nod to the red theme running throughout the house.
This was a very fun and rewarding renovation project.  Thanks to our kind and helpful neighbor, the house sold before we even had even gotten it into the Multiple Listing Service.  A lasting benefit of this project is that the prior owner had a small business selling eggs out of a refrigerator she kept on the front porch.  Our daughter continued to sell the eggs and when we sold the house, we took about 15 chickens with us to start our own flock.  We're up to over 40 chickens now and our daughter regularly buys her own toys with proceeds from her egg sales!    

Stay tuned for more awesome renovation projects from Sandollar Remodeling and Team Jerri and Virgil.